Wiring, Lights & Towing Mirrors
How to Fix a Corroded Trailer Plug
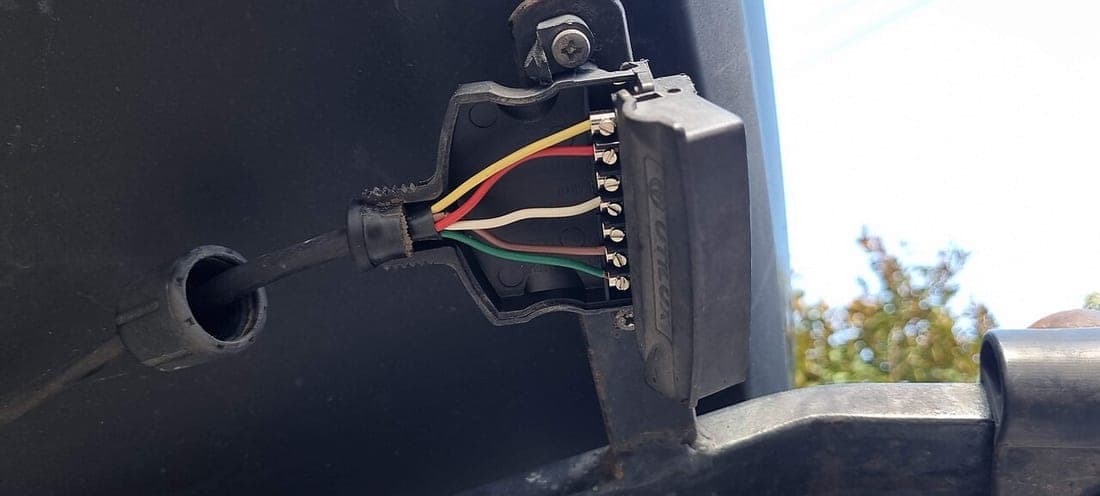
The connector is the most exposed electrical joint on the whole rig, and it is where most trailer wiring faults actually live.
Disclosure: we earn a commission if you buy through the Amazon links on this page, at no extra cost to you. Commission never decides a verdict or a ranking position - read our editorial policy and affiliate disclosure.
How we assessed these: Diagnostic sequence and cleaning method for consumer trailer connectors. Replacement parts are assessed from each maker's published specifications.
Short answer
Disconnect, scrub each pin with a small brass brush or a plug-cleaning tool, blow or wipe out the shell, test continuity pin to pin, then protect the joint with dielectric grease and keep the cover closed. If a pin is pitted, loose in its socket, or green all the way down the barrel, replace the connector rather than cleaning it again.
Almost every intermittent trailer lighting fault starts here. The connector sits low, behind a vehicle, in the spray from the road, and it gets plugged and unplugged with wet hands. Copper in that environment oxidizes, oxide is a poor conductor, and a poor conductor produces exactly the symptoms owners describe: lights that work until you hit a bump, one function missing, or brakes that come and go.
Read the corrosion before you clean it
- Light green or dull film on the pin faces. Normal oxidation. Cleaning will fix this properly.
- White powder around the shell. Usually salt and road grit rather than failed metal. Clean and protect.
- Green that continues down into the barrel or up the wire. Corrosion has wicked into the conductor under the insulation. Cleaning the face will not help - the resistance is inside the wire. Cut back to bright copper and fit a new connector.
- A pin that moves or feels loose when you push on it. The crimp or the socket has failed mechanically. Replace.
- A melted or discolored pin. Something has been running hot, which means high resistance under load. Replace, and check what that circuit feeds.
Cleaning it properly
The sequence
Unplug and park
Separate the trailer and vehicle connectors. Work on them unplugged so you cannot short pins together while scrubbing.
Scrub each pin individually
A small brass brush, a dedicated connector tool or fine abrasive paper rolled around a matchstick. Work each pin face until it is bright. Brass is kinder to the plating than steel.
Clear the shell
Get the grit and old grease out of the housing. A rag, a cotton swab and a blast of air. Debris in the shell holds moisture against the pins.
Test, do not assume
With a multimeter or a connector tester, confirm each circuit is live at the vehicle side and continuous to the lamp on the trailer side. This is the step that tells you whether the problem was ever the plug.
Grease and close
A light coat of dielectric grease on the pins keeps water off the metal without insulating the contact. Then shut the spring cover - it is the only reason the vehicle socket survives at all.
When the plug is not the fault
A clean connector that still misbehaves points somewhere else, and the most common somewhere is ground. Trailer lighting grounds through a wire bonded to the trailer frame, and that bond sits in the same spray the connector does. A corroded ground produces the strangest symptoms in trailer wiring - lights that dim when another circuit is on, turn signals that flash the brake lamps, functions that work only when another one does.
Work through the trailer lights diagnostic sequence, which checks ground first for exactly this reason, and keep the wiring color codes and the seven-pin pin-out to hand so you are testing the right pin for the right function.
Quick picks
Tap any row to jump to the full write-up. How these are chosen - and what we do and do not claim to know - is published in full on our research methodology page.
| # | Product | Best for | Our read | Price |
|---|---|---|---|---|
| 1 |  CURT 7-Way RV Blade Connector Plug (trailer side) Best replacement plug | Replacing a corroded trailer plug | The trailer-side fix when cleaning is not enough | Check price on Amazon #ad Affiliate link - we publish no price; Amazon shows the current one |
| 2 |  Hopkins 7-Blade to 4-Wire Flat Adapter Best adapter to replace | Pulling a small trailer with a big truck | Adapters corrode first and are cheapest to renew | Check price on Amazon #ad Affiliate link - we publish no price; Amazon shows the current one |
| 3 |  CURT Custom Vehicle-to-Trailer Wiring Harness (T-connector) Best vehicle-side renewal | Adding trailer wiring without splicing | Plug-in harness when the vehicle socket is the problem | Check price on Amazon #ad Affiliate link - we publish no price; Amazon shows the current one |
The replacement parts in detail
1. Best replacement plug
CURT 7-Way RV Blade Connector Plug (trailer side)
CURT · Best for replacing a corroded trailer plug
The trailer-side plug for a standard 7-way RV blade connection. Replacing a corroded plug is a twenty-minute job and fixes a surprising share of intermittent light and brake faults - far more often than the fault is actually in the truck.
Published specifications
What works
- Cheap, standard part that cures a lot of intermittent faults
- Screw terminals, so no special crimping tool is needed
- Fits the standard 7-way RV pattern used across the US
What does not
- Only the trailer half - a corroded vehicle socket needs the other part
- Short one-year warranty compared with CURT's structural parts
Skip it if
Not the part you need if your trailer uses a 4-way flat - check which connector you actually have before ordering anything.
#ad Affiliate link - we publish no price; Amazon shows the current one
Raw specifications: CURT’s own page. We earn nothing on that link.
2. Best adapter to replace
Hopkins 7-Blade to 4-Wire Flat Adapter
Hopkins Towing Solutions · Best for pulling a small trailer with a big truck
Lets a truck with a 7-way socket pull a trailer with a 4-way flat plug. It passes lighting through and nothing else - no brakes, no charge line - which is exactly what people misunderstand about adapters.
We have not sourced a full specification table for this model from the manufacturer’s own site at a stable address. Rather than repeat figures we cannot cite, the assessment above is limited to what the design and the maker’s published description genuinely establish.
What works
- Keeps one truck able to tow both connector types
- Costs almost nothing and lives in the glovebox
- No wiring work at either end
What does not
- Carries lighting only - electric brakes and the charge line do not pass through
- Hanging adapters strain the socket if left in permanently
Skip it if
Do not use it to tow a braked trailer - the brake circuit is simply not present in a 4-way, and an adapter cannot invent one.
#ad Affiliate link - we publish no price; Amazon shows the current one
3. Best vehicle-side renewal
CURT Custom Vehicle-to-Trailer Wiring Harness (T-connector)
CURT · Best for adding trailer wiring without splicing
A vehicle-specific harness that plugs into existing factory connectors instead of splicing into tail light wiring. Buying the right one for your exact year and model is the whole job; getting that wrong is why people end up cutting wires they did not need to cut.
We have not sourced a full specification table for this model from the manufacturer’s own site at a stable address. Rather than repeat figures we cannot cite, the assessment above is limited to what the design and the maker’s published description genuinely establish.
What works
- Plugs into factory connectors, so nothing is cut and nothing is taped
- Reversible - the vehicle goes back to standard in minutes
- Avoids the voltage problems that come with scotch-lock splices
What does not
- Vehicle-specific, so the part number must match year, model and trim
- Some vehicles need a separate power feed the harness does not supply
Skip it if
Not the part for a trailer needing electric brakes - that is a 7-way install with a brake controller feed, which a lighting harness does not cover.
#ad Affiliate link - we publish no price; Amazon shows the current one
Raw specifications: CURT’s own page. We earn nothing on that link.
Keeping it from coming back
- Close the vehicle socket cover every time. It is a spring-loaded lid and it is the whole defense.
- Grease the pins at the start of each season rather than after the first fault.
- Rinse the connector with fresh water after any salt exposure, including a salt-water launch and a winter road.
- Support the cable so the plug is not hanging on its own wires - weight on the crimps is what pulls them loose.
- Keep the coil short enough that the plug cannot drag on the pavement when you turn tight.
Adapters deserve a note of their own. A four-to-seven or seven-to-four adapter adds two more connections to a chain that already struggles, and they are usually the first thing to fail. If you use one permanently, treat it as a wear item and replace it rather than nursing it - and remember that an adapter does not create circuits the connector never had.
Key takeaways
- Most intermittent trailer lighting faults are connector or ground faults.
- Green inside the barrel means replace, not clean.
- Brass brush, not a file - keep the plating.
- Test continuity after cleaning so you know whether the plug was the fault.
- Dielectric grease and a closed cover is what makes the repair last.
How we sourced this
Every figure on this page came from one of the following, each fetched while the page was written. Where a manufacturer or regulator does not publish a number, we say so rather than estimate it.
Common questions
- Can I clean a corroded trailer plug with a wire brush?
- Use a brass brush rather than steel, and work each pin until the face is bright. Avoid filing the pins flat - that removes the protective plating and leaves a worse contact than the corrosion did.
- Should I use dielectric grease on a trailer connector?
- Yes. A light coat on the pins keeps moisture off the metal without preventing contact, because the pins wipe through it as they seat. Apply it after cleaning, not instead of cleaning.
- Why do my trailer lights work intermittently?
- Most often a corroded connector or a corroded frame ground. Both produce resistance that rises and falls with vibration and moisture, which is exactly what intermittent means. Clean and test the connector, then check the ground bond at the trailer frame.
- When should I replace a trailer plug instead of cleaning it?
- When a pin is pitted, loose in its housing, discolored from heat, or green down into the barrel and up the wire. In that last case the corrosion is inside the conductor and cleaning the face changes nothing.
More in Wiring, Lights & Towing Mirrors
Nearly every trailer electrical fault is corrosion or a bad ground. Knowing which wire does what turns a roadside mystery into a five-minute check.
Read next
Troubleshooting
Trailer Lights Not Working
An ordered diagnostic for trailer lighting faults, including what specific symptoms tell you about where the problem is.

Reference
7-Pin Wiring Diagram
The seven circuits and what each one does, the common color convention, and how to confirm it on your own vehicle.
Reference
Wiring Color Codes
4-way and 7-way color conventions side by side, with the honest caveat about aftermarket wiring and how to verify.
Best wiring harness
Best Wiring Harnesses
Vehicle-specific harnesses, replacement plugs and adapters - what each is for and which part fails first.
Found something out of date, or a figure you can source better than we did? Corrections get read first. How we research explains how these pages are put together, and contact is one click away.